Friday, December 19, 2014

Scavenging leds from Christmas decoration


Well it's that kind of the year again. Christmas is arriving. That means that the shops are full of christmass decorations. And that is something worth looking into.

Our local pennyshop called Action stocks lots of christmas decorations which are bundles of leds powered by batteries. The have them in all sorts but these are the most interesting for our purposes:

Each package consists of 40 bright leds. Some packages only contain blue leds, others only red leds and some packages consist of 40 leds being 10 red, 10 blue, 10 green and 10 yellow leds. These packages cost less as 2 Euro. Meaning you will have 40 really bright leds for 2 euro being 5 cents pro led. That is a bargain. So I bought multiple packages.

There is an added bonus even:
The leds are supplied with a battery box that accepts 3 AA batteries and has an on/off switch. We can use that as a power source for some of our future projects !!

To scavenge the leds we start with the last one in the chain. Follow the lead and cut the wire as near as possible at the previous led:


Next step is to strip the wires and test the led with a button cell like the CR2032 which supplies 3 volts. You can also test the leds with an AA battery.

Now mark the + side of the led with a marker so you'll know what the Anode and Cathode are when you need them later.

Now as you see at the next picture the leds are captured in some kind of plastic holder.
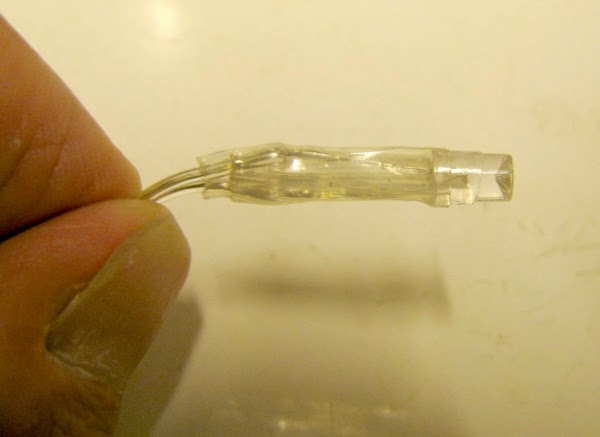
Fortunately you can carefully bend that plastic wrapture as it is kind of flexible. This makes it easy to use the leds in smaller (thin) housings for your projects.

I stock the leds in separate plastic bags sorted by colour which makes it easy to find the right led for my project when needed.

So this makes it easy to get your yearly supply of really bright leds at a very low price. I have used these leds in several of my projects like my - Walking Safety Larson Scanner Lights- and an Electronic Hourglass. Both projects will find a place on the site in the future. So keep on reading.

Tuesday, November 25, 2014

Something New 

Today I received another package from China.
It contained 2 transmitter and receivers for communication with Arduino. Not for IR but on 433 Mhz.

The model of the receiver is
XD-RF-5V. The 5V indicates that it works on 5 volts. The transmitter listens to the name XD-FST and operates from 3.5 volts to 12 Volts. The higher the voltage the bigger the range.

You can find details on how to use it here on instructables and a detailed instruction for Arduino here and more here and here on goes the list here and here and even more here. You can find the original page for the library here. And the most easiest of all is found here.


Saturday, November 22, 2014

Another shipment came in


I have several shipments coming in from China. At this moment notrhing beats the prices the Chinese are asking for electronics. So as long as it is possible I buy my gadgets there. This time an Arduino-Nano compatible processor board which is scandalous low in price and it even comes compleet with an USB cable. Programmable with the Arduino IDE.

There was only one catch. I needed for my Windows 7 machine a specific driver.

Anybody who might experience the same problem and is in windows driver hell can try this driver:


Arduino Nano driver

This Arduino Nano clone is a complete arduino intended for breadboard use or direct use on a pcb. I have plans for this.

Friday, November 7, 2014

Schilderij Lijstje


My girlfriend is a painter. She has been an artist for many years. One of her specialities is miniature paintings. We call them Kadoosjes (Dutch for gift in a box). This is because they are so small you can fit them in a matchbox. You can find her paintings here:

 
The paintings are sold on art-markets, expositions and sometimes in galleries. So we had to find a way to display them. Therefore I designed a miniature frame and printed several of them.

The frame was designed as usual in Tinkercad.


And the printed version looks like this:


Below you will find the STL files you can print if you happen to have purchased one of these Kadoosjes. You can however adapt it for your own purposes.

Frame

Thursday, November 6, 2014

Hook for shelves


Working with a 3D printer always gets you some waste plastic and plastic of failed prints. The general idea is to sometime build a filastruder. Foir thoise of you unknowing what that word means: it is an apparatus that reclycles wast plastic into new filament. That is why I save the waste plastic. A plastic bag is dangling from one of my shelves on my desk and in that the plastic is saved. After months of clumsy falling of that bag I wondered why on earth I build my 3d printer if I did not use it practically.


First I designed the hook in Tinkercad
https://www.tinkercad.com/things/1LcrBkxabdR-shelfhook


Here is the design on my printerbed. 


Right the first time !!!!
Below you will find the STL file which can be adapted for your own purposes.

Tuesday, November 4, 2014

Spacers also to be used as piggybank


At my job large posters and several other advertising materials are printed by ourselves. The necessary paper for this is delivered in large carton tubes. So I just had to see if I could find some usefull purpose for the leftover tubes.


My idea was to use them as a storage tube. 20CM tubes in which I could store my leds. So I directly strated making some. One for my red leds, one for the green leds and one for the blue leds.


And then another idea came to me. I could make a piggybank from these by making a small opening in the lid.


The design is made in Tinkercad There is ample chance that if you find some tubes that they will have the same size as mine did. You can however make the piggybank also from toiletpaper rolls. Use your imagination. You can find the STL files here.


Toplarge

Toplargecoin

Monday, November 3, 2014

Wiretester

And then a thought came to me. Simple but effective. And nobody on the original staory noticed it !! Ok what am I talking about ???

Well we made a simple polarity tester. It tests which side of a battery or power supply is the ground and which is the positive lead. You can find how to build it by clicking here.

Now I thought that there is another purpose for this really clever tester. You can use it as a wire tester.


Look at the picture. I am testing a double wire here. At one end shorten the leads. At the other en put a battery on one end of the lead and connect the other lead and the other pole of the battery to the polarity tester. If one of the leds goes on you know the lines are not broken. This is ok for short leads.


This picture shows how you can use this if the wires go into (for example) another room. Just put a battery on on end of the wires and the polaruty tester on the other side. it does not matter on which wire you put the positive lead of the power supply (or battery) and on which wire you put the polarity tester leads. If the wires are not broken one of the leds will be on.


And this picture shows how easy it is to use the polarity tester as a single wire tester.

A real multipurpose tool is this polarity tester.

Sunday, November 2, 2014

Polarity tester


So every once in a while I have a power supply of which I do not know what the polarity of the wires is. Testing with a multimeter is off course an option. But I chose to make a polarity tester for this purpose.

The general idea behind it is very simple. Take two leds and solder them opposite wise, meaning positive lead from first led to ground lead of the other one. Now add a current limiting resistor and that's it. Now make sure you solder a RED wire to the postive lead of the green led and a BLACK wire to the ground lead of the green led. Just look at the diamgram below.


I soldered it on a prototyping PCB and that looks like the next picture


Remember the leds. I scavanged them from some Christmas decorations like I wrote in my blog which you can re-read by clicking here.

Next I designed an enclosure in Tinkercad. You can find the Tinkercad design in this link which I provide so you can edit it for your own purposes. I will also set a link to the STL file at the bottom of this story so you can print it right away.


The next picture shows you my box being printed. Maybe not completely obvious from the pictures but the wholes for the leds are in the bottom of the box, which therefore automatically is the top......


Now the RED wire is the positive lead and the BLACK wire is the ground lead. So look what happens if I put the BLACK wire on the positive connection of your power supply and the RED wire to the negative connection:


Indeed the RED led lights up as the connections are wrong !!!

Now look what happens if the connections are right. So the RED lead is on the positive lead of your power source (a CR2023 battery here) and the BLACK lead on the ground connection of your powersource:


YEAH !!! Thats it. Red for positive and BLACK for ground. Childsplay. This will work up to a considerable voltage before you will burn out the leds. But hey leds are cheap so dont worry.

I stole this idea from an instructable which you can find here.

All that's left now is to provide you with the STL file.


Polarity check STL

Saturday, November 1, 2014

Ledstripholder


Sometime ago I bought at a dollar-shop a cheap RGB-strip with a length of 5 meter. The strip is controlled by a remote control which (amongst other) sets color and intensity. We have installed the ledstrip on top of our bookcase. This makes it reflect against the ceiling which gives a nice soft glow.

A disadvantage was that the damn thing kept dropping of the bookcase. It just would not stay put. So after a while messing with tape and velcro I declared myself being a fool. I am the owner of a 3D printer. So !!!

It took me half an hour designing in Tinkercad and then my ledstripholder was finished.


The wide opening fits over the bookcase boards and the small opening holds the ledstrip. I made the width into which the ledstrip should fit a bit smaller as the actual width of the stip (just a mm). The strip is therfore jammed in the holder.

Half an hour later I had printed 5 pieces of this holder.

This is not going anywhere anymore.